Creating Individual Monitor Mix With Art Head Amp Pr

How you mind to yourself while yous record is critical to getting a good functioning, and dialing in a monitor mix tin be one of the initial sources of frustration for engineers and musicians akin. The skilful news is that well-nigh every audio interface provides some level of personal monitoring ability. This article volition cover the nigh mutual types of low-latency personal monitoring solutions available on sound interfaces today. While we'll be using PreSonus® audio interfaces every bit examples because we know them best, these principles tin be applied to any audio interface that provides like monitoring solutions to the ones described here.
The Dull Moving Elephant in the Room
Showtime things outset: Allow's talk nigh the problem. We tin can sum information technology up in a single word: Latency. And in one case y'all know what latency is and how it works, it gets easier to find your way effectually information technology while monitoring your performances when you lot're recording.
 Latency is the time it takes for the sound you are generating to come up back to your headphones, and many things touch information technology. But basically, everything between your guitar, for example, and your headphones, needs a piffling time to perform its part, and that time adds upward.
The most meaning contributor to latency is the buffer size you've prepare in your DAW. Depending on your audio driver, this buffer size tin can be set from sixteen to 4,096 samples. The buffer size determines the amount of time you are allocating for your computer to process the incoming data. This fourth dimension adds to the delay between what you are recording and what y'all are hearing. Nosotros know what y'all're thinking: "But 16 samples isn't that long…."
And that's precisely the problem. Depending on how fast your estimator is and how much RAM information technology has, xvi samples might not be enough time for it to practice everything it must to tape and playback audio. When you don't classify enough time for your computer to do its job, information technology will insert artifacts (pops, clicks, distortion) into your recording.
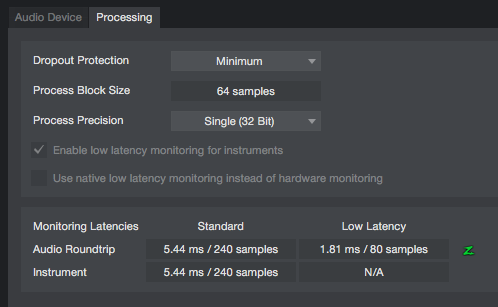 As a general rule, the lower the buffer size, the harder your computer is going to have to work. Then, if you decide to monitor through your DAW, you volition accept to contend with some corporeality of latency. Studio I provides some relief for this problem with native low-latency monitoring. Studio One's audio-engine latency management allows you to better manage your system buffers. The result is faster performance and better stability, including flexible dropout protection that reduces the risk of audio dropouts in CPU-heavy songs, fifty-fifty at minimal buffer settings. This is made possible past separating the processing cycles for audio monitoring, virtual instrument monitoring, and playback.
Depending on the settings for Device Cake Size and Dropout Protection, native low-latency monitoring can exist achieved even with complex songs using many plug-ins and virtual instruments. Higher Dropout Protection settings consequence in a larger block-size for playback, while smaller Device Block Size settings result in lower audio and virtual instrument monitoring latency.
For a deeper dive into Digital Audio Latency, please meet this article.
Many audio-interface manufacturers have solved the trouble of monitoring latency through a DAW past providing null-latency or low-latency monitoring solutions onboard their interfaces. That is what the remainder of this article will explain.
Direct Monitoring
No matter which manufacturer's product you lot are using, you may take heard the term "Direct Monitoring." This refers to the ability to monitor your input indicate directly from the interface before information technology goes to your DAW. This removes the biggest chunk of processing fourth dimension and allows you to hear your input source about instantaneously.
In that location are substantially four means that Direct Monitoring is accomplished:
- A blend control
- A switch
- A simple DSP mixer
- A more complex DSP mixer
Each of these solutions has unique benefits. Let's take a closer look at how to become a great mix with each one.
 Some DAWs, like Studio One, enable software monitoring by default. Because you'll be monitoring your input from your interface, you'll desire to plow that off in society to prevent hearing your depression-latency input point composite with your latent input signal coming from your DAW. In Studio One, information technology's as simple as clicking on the monitor button on the track. Check the documentation that came with your DAW to find out how to turn this off. You'll want software monitoring disabled regardless of which direct monitoring solution your audio interface employs.
Option 1: The Blend Control | AudioBox USB 96, AudioBox iTwo, and Studio 24c

Ane of the easiest solutions is to simply blend the analog input bespeak with the playback from the computer. The simple analog Mixer knob on the front panel of the PreSonus AudioBox USB 96, AudioBox iTwo, and Studio 24c allows you to blend the analog (pre-converter) input bespeak with the stereo playback stream from the reckoner.

If you're thinking this sounds similar a crossfader on a DJ mixer, you're spot on. In this case, you lot're crossfading between your inputs and your playback. The further to the left you plow the knob, the larger the percentage of the input indicate is in your mix. The further to the correct y'all plow it, the more playback you lot will hear.
To dial in your monitor mix, you lot just prepare a good recording level in your DAW and adapt the alloy knob to sense of taste.
Option 2: The Direct Monitoring Switch | AudioBox iOne, Studio 26c, and Studio 68c

A similar solution is utilized by the AudioBox iOne, Studio 26c, and Studio 68c. These interfaces provide a Directly Monitor switch that sums the analog signal with the playback streams, giving you an equal mix of the two.
To punch in your monitor mix, ready a good recording level for your input and adjust the output level of the playback from your DAW past raising or lowering the Main output level of your DAW to taste using the main fader in your DAW console.
Option iii: The Simple DSP Mixer | Studio 1810c and 1824c

More advanced interfaces, like the Studio 1810c and Studio 1824c, provide onboard DSP that allows you to create a basic monitor mix. This is where things get a lot more flexible and a lilliputian more complicated. What makes the DSP mixer solution seem daunting is that all the connections are invisible, so information technology can go far difficult to empathize how all the audio is routed.
Let's accept a closer look at the Studio 1810c.
What if we told you that the monitoring solution that came with your Studio 1810c looked like this:

Note: For the sake of simplicity, this illustration omits the digital I/O bachelor on the Studio 1810.
While the mixer in the analogy above exists in the software domain only, its functions are essentially the same as the analog mixer in our example. The mixer in UC Surface is hardwired with input signals from the Studio 1810c and the output signals from your DAW. These sources are so summed into 3 dissimilar stereo mixes.
When UC Surface is enabled, the outputs from your DAW e'er go through UC Surface first earlier they are sent out the physical outputs of your Studio 1810c. The inputs of your Studio 1810c are dissever as shown below:

Option 4: The Complex DSP Mixer | Studio 192 Series
Some interfaces, like the Studio 192 Mobile and Studio 192, provide powerful onboard DSP with almost of the functions one would find on a digital panel. Anyone who has recorded using a PreSonus StudioLive® mixer (or anyone who has tracked with whatsoever mixer, for that matter) knows how important it is to be able to record a runway while hearing effects, as well every bit compression and equalization. For example, if reverb on a vocal is going to exist part of the last mix, it'south nearly impossible to tape the vocal "dry" because phrasing and timing are totally different when you tin can't hear the duration and decay of the reverb.
The Studio 192 and Studio 192 Mobile provide the same user experience as monitoring through an outboard mixer, without the additional cost, complication, and cabling that kind of setup entails. These devices are equipped with a powerful onboard DSP that is capable of running xvi instances of the Studio One Fatty Channel plug-in, plus reverb and filibuster.
Merely like the unproblematic DSP mixer, a circuitous DSP mixer similar the i used by the Studio 192 and Studio 192 Mobile provides the same features as an inline digital mixer. In this way, y'all can create a professional sounding monitor mix.
Considering the Fat Channel processing can be printed while recording, the Studio 192 and Studio 192 Mobile provide some other unique do good: If you like the sound of the audio in your headphones, you can cull to tape exactly that sound, leaving your gate, pinch, and EQ processing a permanent office of your audio.
The residuum of this section will provide a step-past-step tutorial on dialing in a monitor mix using a Studio 192 or Studio 192 Mobile. Again, these aforementioned steps can be used for any Studio-series interface. The Fat Channel processing, nonetheless, is unique to these products.
Footstep 1: Gain Staging
The outset step is to fix the input level of your source. This should be set by using the metering in your DAW, not UC Surface. For more data on Proceeds Staging methodology, please see this article.

Step two: Select Your Mix
Select the mix with which y'all'd like to showtime. For our tutorial, we will be starting with Mix 1/ii.

Stride 3: Set up Your Channel Level
Raise the fader until you have a good level for your mix.

Step 4: Set up Your Pan
Adjusting the panning of your aqueduct tin can make it more than present in the mix by giving it room to stand up out amongst the other channels. Setting the pan position to center for every channel tin cause comb filtering and distortion, so taking a few extra minutes to punch in the pan position for your channels is worth the effort.

Step five: Dial in Your Dynamics and EQ
Select your channel and suit the gate, compression, and EQ to sense of taste.

Step 6: Decide if You Want to Impress
If you like what y'all hear, you tin can engage the Post Send button. This will tape the signal exactly every bit yous are hearing it, gate, pinch, EQ, and all.

Pace seven: Add Some Reverb
Click on the FX A Mix and raise the fader to prepare the amount of reverb you'd like to add.

Choice v: Software-Based Monitoring via a Low-Latency Interface | Quantum Series

As audio technology evolves, connectivity speeds rise while latency numbers fall. And information technology's simply with the advent of Thunderbolt connectivity that we have been able to create the Quantum series of interfaces that, for the first time, feature a round-trip latency low enough to make many of the above monitoring solutions a petty obsolete. That sounds great and all, simply what does that mean, practically speaking?
Information technology means that the Quantums pass indicate to and from your DAW quickly enough to allow monitor mixing and routing to be managed past Studio One rather than in the interface hardware itself—and it happens then darn fast that the latency is typically non even aural to a degree that would screw up your performance. Remember that deadening-moving elephant in the room from the top of this article? Well, the Quantums have effectively shipped the elephant back to a wildlife preserve, where you don't take to worry about information technology any more.
This power comes with some caveats that verteran interface users may need to get used to. For example, with a Quantum-series interface, y'all tin't monitor straight from the inputs on the hardware—you need to have a DAW running and prepare with Quantum to monitor the performance. This means you tin can't use it as a standalone mixer without a DAW, for case. Furthermore, yous won't be using Universal Control to manage your routing or monitor mixes—it will exist 100% handled in your DAW.
You can gear up monitor mixes with your Quantum interface using Studio One'south unique Cue Mix feature. Cue Mixes are prioritized by Studio I to take reward of the lowest possible latency. While yous're welcome to ready your ain Cue mixes, nosotros've done a lot of the piece of work for you already with Studio One'south interface-based templates. At the time of this writing, Studio One includes templates for Quantum, Quantum ii, Quantum 4848, and Quantum 2626—and they have some handy default monitoring routing all prepare up for y'all!
Step 1. When creating a new song, click the Interfaces tab and choose your Breakthrough interface.

2. Visit the I/O screen in Song Setup to bank check out the Cue mixes that have already been set for you! (Check out the Outputs Tab)
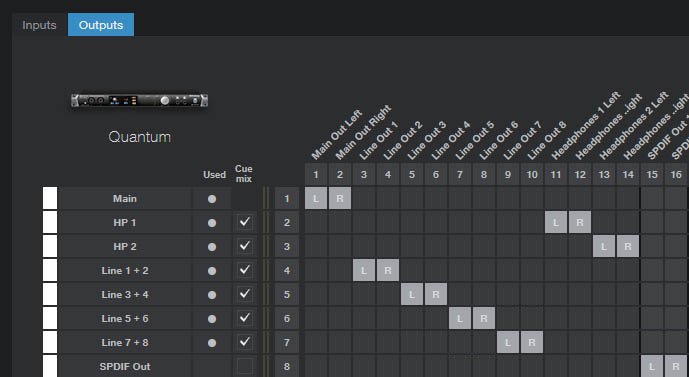
Above, you can come across Cue Mixes prepare for two headphone outputs (HP1 and HP2, representing the Headphone Outs on the front of the Quantum) and several Line Outputs in stereo pairs, assigned to the Line Outs on the back of the Quantum. Note that this configuration is very useful for distributing mixes to a headphone amplifier similar the HP60.
three. Going back to Studio One'south Panel, you lot'll notice your Cue Mix send controls in your audio channels.
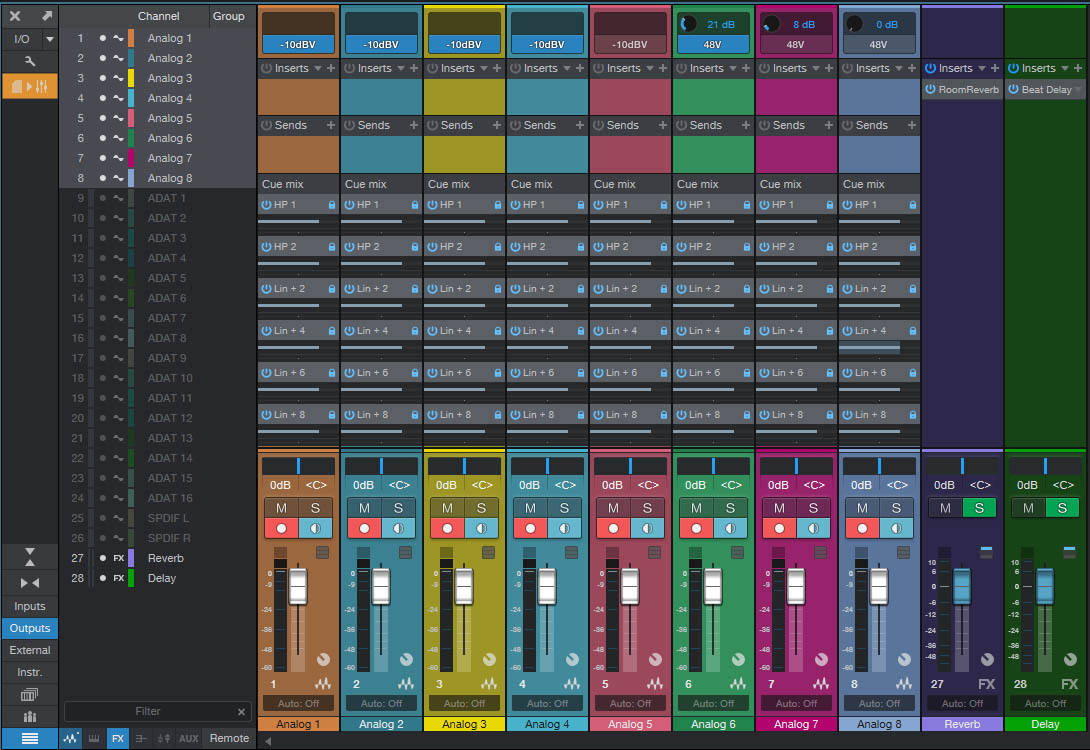
Here, you can suit the level of each channel to each Cue mix. So when your bass player wants to hear more kicking drum, hither's where you permit 'em have it. And when anybody needs less contrabass sousaphone, here's where y'all'll have it abroad.
Source: https://www.presonus.com/learn/technical-articles/How-Do-I-Make-a-Monitor-Mix-With-My-Audio-Interface
0 Response to "Creating Individual Monitor Mix With Art Head Amp Pr"
Post a Comment